Lambda logo
For other uses, see Lambda (disambiguation). |
| Warning! This article has yet to be cleaned up to a higher standard of quality, per our Cleanup Project. It may contain factual errors and nonsense, as well as spelling, grammar and structure issues, or simply structure problems. Reader's discretion is advised until fixing is done. | ||
|---|---|---|
You can help clean up this page by correcting spelling and grammar, removing factual errors and rewriting sections to ensure they are clear and concise, and moving some elements when appropriate. |
| This article would greatly benefit from the addition of one or more new images. | ||
|---|---|---|
Please upload one or several relevant images (from canonical / official sources) and place it here. Once finished, this notice may be removed. |
The Lambda logo (λ) is a symbol found frequently in the Half-Life series. It represents the Greek letter "l" (lowercase "L"), and is a radioactive decay constant used in the half-life equation.
Contents
Appearances[edit]
Half-Life story arc[edit]
In the original Half-Life, Gordon Freeman's trademark HEV Suit was marked with a Lambda Logo on the chest, as were other HEV Suits, due to their use in the Lambda Complex - a section of Black Mesa dedicated to teleportation research - identifiable by the Lambda logo at its entrance.
Half-Life 2 story arc[edit]
Gordon's Lambda logo on his suit and the work of the Lambda Complex became something of a legendary trademark symbol for the Resistance against the Combine, referring to the acts of Gordon Freeman during the Black Mesa Incident, and turning the symbol into an informal logo for the Resistance, reminding of the real world Anarchist symbol, of similar purpose. They would spray-paint it near supply caches, and resistance bases and safehouses such as White Forest, Black Mesa East, and Kleiner's Lab. Resistance fighters also wear the symbol on their arm bands. They are also used to identify Resistance-friendly Combine weapons such as Hopper Mines and Sentry Turrets, seen by the spray-paint on them.
The Lambda logo can be seen on certain vehicles, such as the orange van that Dog throws to the Citadel in Episode One although any van-type vehicle, regardless of color, has a Lambda logo under the right tail-light. The lambda is also seen in graffiti and propaganda posters across City 17.
A huge Lambda logo can also be found on the rocket hatch and a smaller one on the button used to launch it at White Forest.
List of exact in-game locations[edit]
The following is a list of all the Lambda caches that can be found by the player in Half-Life 2; they count towards the Lambda Locator Achievement.
A Red Letter Day[edit]
- Cache 1/45 (
d1_trainstation_05): Upon meeting Alyx Vance, she will bring Gordon towards Kleiner's Lab. The entrance to the lab is disguised as a Dr. Breen's Private Reserve machine, with a lambda logo to the right of it. While this lambda symbol only denotes a Resistance base, it counts towards the Lambda Locator achievement and cannot be missed.
Lambda logo outside of Kleiner's Lab.

Route Kanal[edit]
- Cache 2/45 (
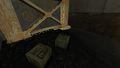
d1_canals_01): After dealing with the Metrocops in the tunnels, Gordon will be tasked with using an oncoming train to get across a gap. Across the gap is a ladder leading to a building with wooden planks covering the entrance. After breaking these, Gordon will see a lambda logo to the left with the associated cache.
Lambda cache.

- Cache 3/45 (
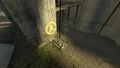
d1_canals_01): Shortly following the last cache, Gordon will have to fight some additional Metrocops, which can be made quick work of with explosive barrels. Along the path is a broken fence, which can be jumped over. A vent with a lambda logo over it can be seen around the pathway. Entering the vent, Gordon will be greeted with the associated cache. This lambda cache cannot be missed.
Lambda logo above the vent.
Lambda cache.


- Cache 4/45 (
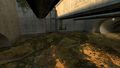
d1_canals_01a): Arriving at Station 1, Gordon will have to dispatch the oncoming Metrocops. Once dealt with, an explosive barrel must be destroyed in order to continue on the path. At the end of the path is a tunnel infested with Barnacles. At the entrance, a lambda logo can be seen to the left, next to a car. Over the car is the associated cache under a fallen oil tanker.
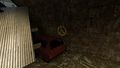
Lambda logo next to the car.

Lambda cache.


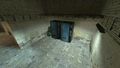
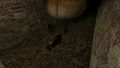
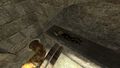
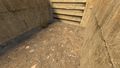
- Cache 5/45 (
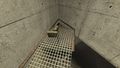
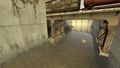
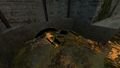
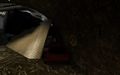
d1_canals_02): After completing a see-saw physics puzzle, Gordon will encounter a Hunter-Chopper, which will have to be maneuvered around. Avoiding the Hunter-Chopper fire and continuing on the path will lead a door blocked by a barrel, which can be moved aside. Inside is small set of stairs, leading to a narrow room with a sewer grate where a lambda logo can be spotted underneath. To the right is a ladder, which can be used traverse underneath the sewer grate to find the associated cache, next to a rotting corpse.
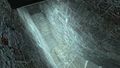
Lambda logo under the sewer grate.
Lambda cache.


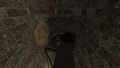
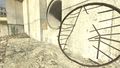
- Cache 6/45 (
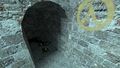
d1_canals_03): Shortly after escaping the underground, Gordon will have to dispatch of Metrocops. Afterwards, a water turbine will be encountered, with a small underwater passageway which leads up to a steam pipe. The path of the pipe will lead to a room with Barnacles, which can be made quick work of with an explosive barrel. At the end of the path is a lambda symbol to the right of wall, next to some breakable wooden planks. Underneath the pipe is the associated cache, next to a rotting corpse.
Lambda symbol next to wooden planks.
Lambda cache.


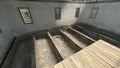
- Cache 7/45 (
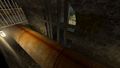
d1_canals_05): Upon leaving the sewers, Gordon will be met with a ladder which leads down to a narrow passageway where Metrocops will grapple down to fire, along with Manhacks. After dispatching of them, Gordon is met with a passageway leading back into the sewers, which leads to a narrow room with a ladder leading up to pathway with wooden planks. To the left of the ladder is a lambda symbol. Taking the path, Gordon will find the associated cache next to a second lambda symbol.
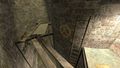
Lambda symbol next to ladder.
Lambda cache.


- Cache 8/45 (
d1_canals_05): Immediately after last cache is an exit out of the sewers, which leads outside to toxic waste. To the left are some wooden planks leading up to pipes. Climbing the pipes, Gordon will find the associated cache, next to a rotting corpse. There is no lambda symbol to denote this cache.
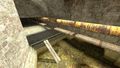
Wooden planks leading up to pipes.
Lambda cache.


Water Hazard[edit]
- Cache 9/45 (
d1_canals_06): After obtaining the Airboat, Gordon will drive through toxic waste, which will lead out to Station 7. On the way, Gordon will find a lambda symbol directly ahead on a wall. On the right is a ladder, which can be climbed to find the associated cache.

Lambda symbol.
Lambda cache.


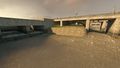
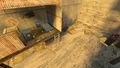
- Cache 10/45 (
d1_canals_06): Approaching Station 7, a lambda symbol can be seen painted on a wall, as well as on a container suspended by a crane containing the cache. Inside, there are two Zombies which Gordon will need to take care of. A set of stairs will allow Gordon to shimmy on top of wooden planks, leading to a ladder where a Headcrab will jump down to attack Gordon. Upon reaching the top, a barrel blocking the pulley must be hit the Crowbar, allowing the container to drop into the water. Inside is the associated cache.
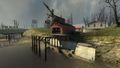
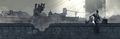
Station 7 from afar.
Lambda logo on the pier.
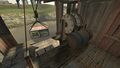
Barrel blocking the pulley from moving.
Lambda cache.


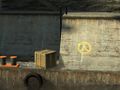
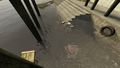
- Cache 11/45 (
d1_canals_06): Upon completing the barrel puzzle and using the Airboat to cross the gap, Gordon will hear a Combine Dropship passing by. Shortly after, a second one can be spotted the path ahead, with Metrocops exiting from a container. Next to the Dropship is lambda symbol next to a broken sewer grate, with a tunnel leading to the cache. Entering the tunnel, Gordon will have to swim underwater into a small cave, where the associated cache can be seen. However, a Zombie will pop from the water and attempt to attack Gordon, which must be dealt with.
Lambda symbol next to a broken sewer grate.

Sewer entrance.

Lambda cache.


- Cache 12/45 (
d1_canals_07): Shortly after leaving the APC garage, Gordon will have to maneuver down the canals, avoiding APC and Metrocop fire. Upon reaching the second APC, a lambda symbol can be spotted underneath it. Avoiding the missile fire, Gordon can crouch under broken sewer grating to enter the cache. The associated cache can be seen next to a hole, where a Headcrab will attempt to attack Gordon. Metrocops will grapple down from the APC to fire at Gordon, which must be dealt with.
Lambda symbol underneath APC.
Lambda cache.


- Cache 13/45 (
d1_canals_08): Avoiding APC missile fire, Gordon will enter a tunnel, where a lambda symbol can be spotted on a wall next to a pulley system. One pulley has the associated cache, while the other has cinder blocks preventing the cache from moving. Upon removing the cinder blocks, the cache will drop down, allowing the supplies to be taken.
Pulley system.
Lambda cache after removing the cinder blocks.


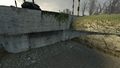
- Cache 14/45 (
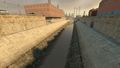
d1_canals_08): Escaping from Gate 5, Gordon will come across a bridge with train cars on top. Underneath the bridge, a lambda symbol can be spotted behind the bridge pillars, next to the associated cache.
Bridge with train cars.
Lambda cache underneath.


- Cache 15/45 (
d1_canals_09): While being chased by the Hunter-Chopper, Gordon will enter a tunnel filled with toxic waste. A lambda symbol can be spotted on a wall on the left, next to a platform held up by wooden supports. The Airboat can be used to destroy the supports, dropping the associated cache.
Lambda symbol above, along with cache.
Lambda cache after breaking the supports.


- Cache 16/45 (
d1_canals_10): Driving through more toxic waste while evading the Hunter-Chopper, Gordon will travel through a brief tunnel leading to a water channel. The walls can be walked on, with one side leading to a dead end where the associated cache can be found. There is no lambda symbol to denote this cache.
Water channel, next to a dead end.
Lambda cache.


- Cache 17/45 (
d1_canals_10): Upon exiting the water channel, Gordon will come under fire by Metrocops grappling from a bridge. Next to the bridge are two small tunnels, which can be entered via the Airboat. Inside the rightmost tunnel is the associated cache. There is no lambda symbol to denote this cache.
Bridge next to two tunnels.
Lambda cache.


- Cache 18/45 (
d1_canals_12): Navigating through more water channels, Gordon will be under fire from an APC, which can be destroyed with the newly acquired Airboat gun. Traversing through the channels, Gordon will meet a fork in the path, with a lone Metrocop on the right, which can be dealt with through an explosive barrel. Taking the rightmost fork will lead to an abandoned outpost where Headcrabs will attempt to ambush Gordon, as well as a Zombie. A ladder can be climbed leading to the associated cache.

Fork in the path.
Lambda cache.


Black Mesa East[edit]
- Cache 19/45 (
d1_eli_01): Upon arriving at Black Mesa East, a lambda symbol can be spotted next to a ladder near the water. While this lambda symbol only denotes a Resistance base, it counts towards the Lambda Locator achievement and cannot be missed.
Lambda symbol.

"We Don't Go To Ravenholm..."[edit]
- Cache 20/45 (
d1_town_01): Entering Ravenholm, Gordon will have to fend of multiple Zombies throughout the deserted town, eventually meeting Father Grigori atop a balcony. Gordon will have to enter a building in order to turn off an electric grid preventing access to the next area. Upon entering the building, stairs leading to two turbines can be spotted, with a lambda symbol painted next to one. A vent can be broken on top of the leftmost turbine, leading back outside to the associated cache.
- Cache 21/45 (
d1_town_01): Later in the chapter, Gordon will soon encounter car crushing traps. Using the switches provided, he can get atop the car and ride it up. A Lambda symbol may be spotted below a fence. Gordon must hop over the fence and head into the enclosed corner. The cache can be found here.
- Cache 22/45 (
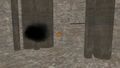
d1_town_01a): Shortly, Gordon comes across Father Grigori again. This time, he'll be shooting Zombies, opposite from Gordon's position. Gordon must clear the area of Zombies, from top to bottom, then climb a ladder to proceed atop the building. At the top, he must walk to the end of the beam and turn left, where a hole in a roof with a Lambda inside may be seen. Deep inside is the cache, as well as a Fast Headcrab.
- Cache 23/45 (
d1_town_05): Gordon can find the final cache of the chapter located immediately after the end of the Ravenholm mine shaft. Above the archway are some supply crates, accompanied by a Poison Headcrab. Behind some ducting, he can findthe cache.
Highway 17[edit]
- Cache 24/45 (
d2_coast_01): Once he acquires the Scout Car, Gordon must follow the faint track in the sand up a hill and he will come across a gap between a bridge. Gordon must use the turbo speed to get across the bridge. Around the next corner is a Lambda symbol marking this location, clearly visible on a red shack at the side of the road. Inside the shack is the cache.
- Cache 25/45 (
d2_coast_03): Near the first Thumper, Gordon can find a small house. It appears to be locked from the inside, but he can access the house via the cellar. A Lambda symbol can be seen obscured by tires. Gordon must break the cellar door and continue into the cellar. Inside will be a Grenade crate and a Poison Zombie, which Gordon can be take out with the Grenades provided. Once it has gone quiet, Gordon can reach the cache by stacking crates and barrels to get above.
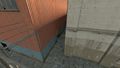
- Cache 26/45 (
d2_coast_04): After the Gunship battle at NLO and the crane segment at Dock 137, another Gunship will be encountered after jumping over the bridge. Gordon must deal with the Gunship using the crate of rockets in one of the cars blocking the road ahead. On the road ahead, Gordon can see a Lambda symbol near a blue van. The van contains the cache.
- Cache 27/45 (
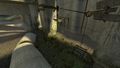
d2_coast_05): After driving for some time, Gordon will come across a Petroleum Station with a surplus of Combine Soldiers and a Force Field blocking the Scout Car from entering. He can disable the force field by removing the parking wedges under the APC powering it. Near the APC, Gordon can find a fenced area with a white gas tank and a Lambda symbol. He can use a barrel to get over a damaged section of the fence. Gordon can find the cache in the enclosed area.
- Cache 28/45 (
d2_coast_07): Gordon can locate the last cache in this chapter right before Bridge Point. After exiting the tunnel, he will see a Dropship dropping Combine Soldiers at Bridge Point in the distance. Upon approaching the area, he can see a large jagged outcrop of rocks on the left. Gordon can find the cache enclosed behind the rocks in a small boarded area.
Sandtraps[edit]
- Cache 29/45 (
d2_coast_09): Sometime after leaving Bridge Point, Gordon will arrive at some oil tankers blocking the path forward. An unopened gate is blocking the Scout Car from entering, but it will open after Gordon finds 3 car batteries in the area. Above the doorway leading to the toilet is a Lambda symbol on the roof. Gordon must use the Gravity Gun to grab the single Energy Ball canister.
- Cache 30/45 (
d2_coast_11): Gordon can find the second and last cache of the chapter at the Antlion-infested beach. In the open area across the rocky outcrops, Gordon will see a wooden shack with no roof, and can easily reach it by using the Gravity Gun to position a long wooden plank across the neighboring outcrop. Upon reaching the shack, he must start climbing above the shack by stacking barrels and crates. Once reaching the top, a white shack with a Lambda symbol can be seen, which is accompanied by its respective cache.
Nova Prospekt[edit]
- Cache 31/45 (
d2_prison_02): Not far into Nova Prospekt, Gordon can locate the first cache. Once reaching the area with 2 Turrets, he will spot a Lambda symbol next to a door. He must then break the planks on the broken glass to reach the cache inside.
- Cache 32/45 (
d2_prison_03): After spotting a dead Vortigaunt on a chair, Gordon heads upstairs to the next floor. Beyond the tripwire, he will see a Lambda symbol marked near a door. The cell door next to it can be slid open to reveal the cache.
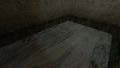
- Cache 33/45 (
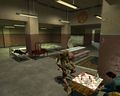
d2_prison_05): The final cache in this chapter is in the laundry room. In the room, Gordon will see a small passageway over the short railing to the right. After hopping over the railing and following the passage, he can find the cache in a small room. Gordon must stay alert however, as a Poison Zombie is in one of the rooms.
Entanglement[edit]
- Cache 34/45 (
d2_prison_06): The only cache in this chapter is found right after Gordon and Alyx split up again. She opens a blocked gate for him, and in the area beyond is a vending machine. Atop the vending machine, Gordon can find a small cache.
Anticitizen One[edit]
- Cache 35/45 (
d3_c17_02): Immediately after emerging from Kleiner's lab with Dog, to the left, Gordon will see a dumpster with a crate near it. He must use the crate to get atop the dumpster, after which the cache will be easily visible next to the wall.
- Cache 36/45 (
d3_c17_04): A little while after encountering the Combine Hoppers, Gordon will enter a courtyard littered with Civil Protection units. There is a surplus of explosive barrels, with one in particular near a tiny red shack. Behind this barrel is a metal sheet, which Gordon can move to find the cache located inside.
- Cache 37/45 (
d3_c17_05): After going around a Combine gate and passing through a series of buildings, Gordon will come through a underground tunnel where Turrets stand watch over a hole in the wall. Through the hole, the path will split into 2 individual paths, one leading upstairs and one leading to the next area. If Gordon heads up the stairs, he can see a cache behind a blocked gate. He must use his Gravity Gun to get the supplies behind the gate.
- Cache 38/45 (
d3_c17_06a): In the second segment of the Manhack-infested underpass, after going around a wall of rubble, Gordon must turn back towards the collapsed roof. He can then find the cache located near the glowing fire.
- Cache 39/45 (
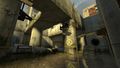
d3_c17_06b): Sometime after one of the Resistance fighters lets down a bridge for Gordon, he will spot a raised bridge between the top of two buildings. Gordon can easily find the Lambda cache near the entrance to the rooftop of the first building.
- Cache 40/45 (
d3_c17_06b): Gordon can spot this Lambda as he is descending through an infested building full of Zombies and Combine Soldiers. At the lowest elevation, he will find a Lambda through a doorway. The cache is blocked by a fence, whose contents Gordon can retrieve by using his Gravity Gun.
- Cache 41/45 (
d3_c17_08): After a standoff with Alyx in the plaza area, Gordon proceeds to an underground area. He will eventually reach a room with a bottomless pit. Gordon can see the Lambda symbol near the lowest platform, and can access its respective cache with a ladder.
- Cache 42/45 (
d3_c17_08): Gordon will come across some Combine soldiers fighting off zombies, this time in a sewer looking area. After dropping down into the lower area, he can find a passageway that leads off to the left. Follow this, and shortly Gordon will come across a ladder to the right. After ignoring this ladder and continuing onward, Gordon will notice the Lambda symbol ahead, where the passage splits. The cache is hidden in a hole in the wall, whose contents Gordon can obtain by using the Gravity Gun.
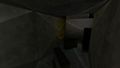
- Cache 43/45 (
d3_c17_08): Gordon can find the next cache very close to the previous cache. If he stands in front of the last cache and looks to his right, Gordon should be able to see another passageway with capped metal pipes inside. He can climb over the pipes and find the cache just ahead.
- Cache 44/45 (
d3_c17_08): Gordon can find the last cache in this chapter located in the large, open room with the lift. Instead of dropping down to continue onward, he instead must navigate around the red corrugated building using the narrow ledge. Gordon should see a faint Lambda symbol behind a wall, and find its cache in the same area.
"Follow Freeman!"[edit]
- Cache 45/45 (
d3_c17_12b): Gordon can find the final cache in the game very far into the chapter. After getting to the building with a Soldier ambush and the Strider under the tunnel, he heads up to the highest level and tries to avoid Strider fire if possible. After getting past the area, he will find a bunch of crates near a Rocket supply crate and should unlock Lambda Locator if he found all the previous caches.
Related Achievements[edit]
| Half-Life 2 | |
|---|---|

|
Lambda Locator (15G) |
| Find all lambda caches in Half-Life 2. | |
| Half-Life 2: Episode 2 | |

|
Cache Checker (10G) |
| Find every radar cache in chapter Under The Radar. | |
Trivia[edit]
- The Lambda symbol is used in the half-life equation to represent the decay constant (i.e. the rate of radioactive decay in an element).
- The Lambda logo is also used to denote the wavelength of a sound or light emission.
- Lambda is used in some programming languages and parts of math to denote a function.
- The Lambda logo can be found as an Easter egg in both Left 4 Dead games. In Left 4 Dead Francis has it shaved into his hair. In Left 4 Dead 2, a Charger zombie is seen hanging from posts in a pose exactly like the lambda logo.
- The Lambda symbol looks not unlike an arm holding a Crowbar, which is of course Gordon's signature melee weapon.
- The Lambda symbol can be found on Dog's back.
Gallery[edit]

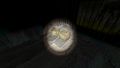
Early promotional poster for Half-Life, with a Lambda logo in a baby's eye.
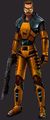
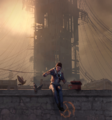
Gordon Freeman in his HEV Suit.

Freeman artwork, with the Lambda logo behind.

The Lambda Reactor Complex logo.

Lambda multiplayer spray.
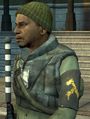
Rebel with Lambda armband.

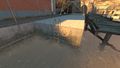
An example of a Resistance weapons cache location signified by the logo.
Ditto.
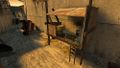
Ditto.
Ditto.
Ditto.

The logo when used to signify a Resistance area or a Resistance weapons cache.
The logo as used in the Half-Life 2 leak map "nether_01"
The logo as seen in Black Mesa East.

The logo as spray painted on a wall in Black Mesa East.
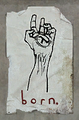
Resistance poster, displaying the lambda logo in a hand, above the word "born".
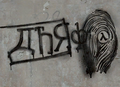
Lambda graffiti in Half-Life: Alyx promotional artwork.
Ditto, banner version.


Half-Life 2 Steam badges[edit]

Level 1: City 17

Level 2: Black Mesa East

Level 3: Ravenholm

Level 4: Resistance

Level 5: Nova Prospekt

Foil: Citadel


