Radio Tower settlement

| |
| Radio Tower settlement | |
|---|---|
| General information | |
| Location | |
| Usage | |
| Era(s) | |
| Faction | |
| Game information | |
| Map(s) |
|
- "A radio tower. If it's working, we need to send a warning to White Forest. They've got no idea the Combine's heading their way."
- ― Alyx Vance[src]
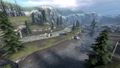
The Radio Tower settlement[1] is an abandoned Resistance base located in the Outlands. During Half-Life 2: Episode Two, Gordon Freeman and Alyx Vance pass through the area on their way to White Forest.
Contents
Overview[edit]

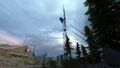
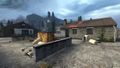
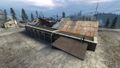
The Radio Tower settlement, placed near a mountain highway, consists of three warehouses and a tall radio tower, and can be accessed through two gates. One of the shacks holds a communication apparatus, used briefly by Gordon and Alyx, and is guarded by two Zombines, the most visible sign of the Combine presence in the past; the second one was apparently a residential building used by Rebels. The third and main warehouse, greatly damaged, contains supplies and - in the basement - power sockets. Propane canisters, car tires, barrels, wooden planks, and supply crates can be found outside, and inside, the buildings.
A small Resistance watchtower with a dead body inside can be found near the settlement.
Appearances[edit]
Half-Life 2: Episode Two[edit]
After obtaining the Muscle Car, Gordon Freeman and Alyx Vance find their path blocked by car wrecks and a collapsed tunnel, and are forced to take a detour. Soon, they arrive at the Radio Tower settlement, noticed earlier by Alyx, to send a message to White Forest about Combine forces heading the base. After turning on the power, they are attacked by a pack of Hunters. Having been victorious, they eventually return to the communication shack to contact Dr. Magnusson. However, Alyx isn't able to tell the leader of White Forest about the incoming Combine forces because the channel dies during the conversation. Freeman and Vance soon leave the settlement using the Muscle Car.
Related Achievements[edit]
| Half-Life 2: Episode Two | |
|---|---|

|
Meet the Hunters (10G) |
| Survive the Hunter ambush with Alyx. | |
Behind the scenes[edit]

The developer commentary of Episode Two reveals some information about the designing process of the Radio Tower settlement.
- According to Nick Maggiore, the scene where Alyx sees the Hunters for the first time since her injury was meant to be a turning point for her as a character, and an emotional highlight of the episode, both for Gordon and for Alyx. The reason a Hunter injured Alyx in the beginning of the episode was so that she could have a strong emotional reaction to the creatures, and use the start of combat as a way of building a good character moment. Alyx's previous encounter has given her a visceral fear of hunters, but in the scene she has to make a conscious choice to get past her fear and into the right state for fighting them. She uses anger to get there. Valve also used Alyx's intensity to draw the player's attention to subtler aspects of the scene-getting the player in position for the best view of the hunters as the attack gets underway.
- According to Lars Jensvold, the transmission scene was meant to restate the goals of the level, while introducing a note of uncertainty and developing Dr. Magnusson's character. This scene helped players feel some connection to Magnusson when they finally reached White Forest and met him in person for the first time. In earlier versions, Valve tried having the Hunters cut the power and interrupt the transmission, but "this felt arbitrary, and players were more receptive to the scene after they had solved the power puzzles and survived hunter combat. It feels like a small reward in addition to the simple satisfaction of beating the Hunters."
- According to Bryn Moslow, the basement of the main building was designed so that the player would notice the main set of plugs right away, but is less likely to spot the second set at first. One end of the long cable is already plugged in, encouraging the player to grab the loose end and put it into the powered socket. This makes the faulty wire break loose and spark. With the power on, players try to return upstairs only to discover that now the elevator needs power. At this point, they look about more carefully and discover the elevator sockets. The short cord is tucked next to the elevator sockets, so that they are likely to use it there first before realizing they need a longer one. Given this fairly reliable progression of events, Valve was able to write a limited number of lines for Alyx, so that she could react each time the puzzle changed state.
- According to level designer David Sawyer, in earlier versions of the Hunter intro, the Hunters burst physically into the room by shouldering their way through the door. As the Hunter's flechette attack came online, Valve decided this was no longer appropriate. Now that the Hunter had an effective ranged attack, having him burst into the room with the player actually put him into his least viable tactical position during the very first encounter, making him seem ineffective and a bit dumb. The current design is intended to showcase his abilities, while giving the player the time and space to understand the situation before pushing out into close combat.

- According to Jess Cliffe, another level designer, the main warehouse interior was designed to train the player in the art of Hunter combat, and during the development process it changed continually to suit the Hunter's behavior. The first Hunter prototypes could be killed only by the blunt impact of physics objects. Therefore, to make sure the player learned this technique, Valve trapped him in this area with one Hunter and kept him locked in until he had defeated it. Upon the Hunter's death, reinforcements broke down the gate and doors, opening up the arena. As time went on, and the Hunter was modified to make it vulnerable to all types of damage, Valve's grip on the player gradually relaxed, permitting freedom of movement and a wider range of tactics right from the start of the encounter.
- According to Jeff Sorenson, even though the settlement appears open and non-linear, Valve was striving for a fairly reliable progression of events, so that they could fine tune pacing. The building holding the communication apparatus is bright and eye-catching, with the intention of drawing the player there first. The entrance to the ruined building is around the back, so that initial exploration through the center of the compound tends to lead to the radio room first. The drop-down entrance from the roof of the ruined building also helped Valve pace the experience, because "players are cautious about committing to a space, until they've explored the alternatives".
Trivia[edit]
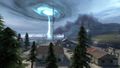
Combine Advisor appears on the screen of the communication apparatus for a split second after Alyx loses connection with Arne Magnusson.
Gallery[edit]
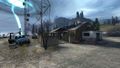
The mountain road located near the outpost.
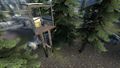
The Resistance watchtower.
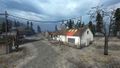
The Radio Tower settlement.
The Radio Tower.
The warehouses.
Ditto.
Interior of the residential building.
The main warehouse.
Ditto.

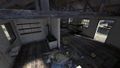
Interior of the rear section of the main warehouse.
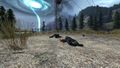
Corpses of dead Rebels.
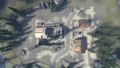
The Radio Tower settlement seen from above.


List of appearances[edit]
References[edit]
- ↑ The Orange Box Prima Guide
| Preceded by Victory Mine |
Half-Life 2 story arc journey | Succeeded by Station 21 |