GLaDOS' testing track (Portal 2)
| The title of this article is unofficial. | ||
|---|---|---|
Although this article is based on official information, the actual name of this subject was created for the wiki. |
This article is about GLaDOS' testing track in Portal 2. For GLaDOS' testing track in Portal, see GLaDOS' testing track (Portal). |

| |
| GLaDOS' testing track (Portal 2) | |
|---|---|
| General information | |
| Location | |
| Builder |
|
| Usage | |
| Era(s) | |
| Faction |
Aperture Science |
| Game information | |
| Map(s) |
|
In Portal 2, GLaDOS uses a newly built testing track consisting of 22 Test Chambers. Its start, the very last Test Chamber from the original testing track in Portal, is connected to the Incinerator Room. The final chamber for this course would have been Test Chamber 22, which is a death trap for Chell.
This testing course is used after GLaDOS is reactivated by accident, courtesy of Wheatley. After her awakening, GLaDOS spends some time fixing not only the chambers related to the test course, but the entire Enrichment Center itself. Over the tests, Chell will witness the drastic changes of these chambers from being overgrown and ruined, to a more clean and perfected state.
Contents
- 1 Test Chambers
- 1.1 Test Chamber 01
- 1.2 Test Chamber 02
- 1.3 Test Chamber 03
- 1.4 Test Chamber 04
- 1.5 Test Chamber 05
- 1.6 Test Chamber 06
- 1.7 Test Chamber 07
- 1.8 Test Chamber 08
- 1.9 Test Chamber 09
- 1.10 Test Chamber 10
- 1.11 Test Chamber 11
- 1.12 Test Chamber 12
- 1.13 Test Chamber 13
- 1.14 Test Chamber 14
- 1.15 Test Chamber 15
- 1.16 Test Chamber 16
- 1.17 Test Chamber 17
- 1.18 Test Chamber 18
- 1.19 Test Chamber 19
- 1.20 Test Chamber 20
- 1.21 Test Chamber 21
- 1.22 Test Chamber 22
- 2 List of appearances
- 3 References
Test Chambers[edit]
Test Chamber 01[edit]

- "Sorry about the mess. I've really let the place go since you killed me. By the way, thanks for that."
- ― GLaDOS[src]
Opening Portal 2’s second chapter, The Cold Boot, this is the first chamber GLaDOS sends Chell through after her awakening. It is actually a damaged version of Test Chamber 06 of GLaDOS' original testing track renamed as Test Chamber 01, but with the Thermal Discouragement Beam replacing the Energy Pellet.
The aim of this test is to get the Thermal Discouragement Beam into the receptacle so that the platform in front of the exit rises. The only mean of accomplishing this is by redirecting the Thermal Discouragement Beam using portals.
Test Chamber 02[edit]

- "This next test involves Discouragement Redirection Cubes. I'd just finished building them before you had your, well, episode. So now we'll both get to see how they work."
- ― GLaDOS[src]
In this chamber, Chell is introduced to the Discouragement Redirection Cube which can be used to redirect Thermal Discouragement Beams along almost any horizontal angle. To solve this test, she has to acquire a Redirection Cube and use it in conjunction with the Thermal Discouragement Beam to activate the staircase before placing it onto a Super Button to open the exit.
Wheatley can be seen briefly near the Vital Apparatus Vent where the Redirection Cube can be obtained.
Test Chamber 03[edit]

The goal of this test is for Test Subjects to have the two Thermal Discouragement Beams in this chamber hitting each of the receptacles simultaneously, so the exit opens. Since there is only one Redirection Cube, they need to make additional use of portals to accomplish this task and complete the test.
A Ratman den can be found in this Test Chamber, along with an Aperture Science Radio that plays "Exile Vilify". Wheatley can also be briefly seen, hiding under the panels.
Gallery[edit]
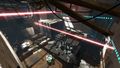
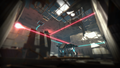
Pre-release screenshot of Test Chamber 03, similar to the retail version.
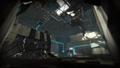
Test Chamber 03 seen in a loading screen.
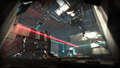
Ditto.
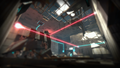
Ditto.
Ditto.


Test Chamber 04[edit]

- "One moment. You're navigating these test chambers faster than I can build them. So feel free to slow down and... do whatever it is you do when you're not destroying this facility."
- ― GLaDOS[src]
The objective is to find a way of getting the Weighted Storage Cube from the alcove onto the Super Button near the exit. To accomplish this, Chell uses portals in conjunction with the Thermal Discouragement Beam to control the Unstationary Scaffold above the moat and move it between the Cube's alcove and its button.
Behind the scenes[edit]
This chamber was supposed to be viewed from inside a pipe during one of the early test introductions for Portal 2.[1] The pipe is still present in the retail chamber.
Gallery[edit]

Test Chamber 04 in an early Portal 2 intro.

Test Chamber 05[edit]

- "This next test involves the Aperture Science Aerial Faith Plate. It was part of an initiative to investigate how well test subjects could solve problems when they were catapulted into space. Results were highly informative: They could not. Good luck!"
- ― GLaDOS[src]
This chamber introduces the Aerial Faith Plate testing element, used to catapult Test Subjects or object over large distances.
The goal of this test is to get a Weighted Storage Cube from the dispenser and place it onto the Super Button near the exit. To accomplish this, Chell has to make use of both Aerial Faith Plates and some precise timing.
Behind the scenes[edit]
According to Kristopher Katz, this was the first test map Valve created when they started to experiment with the Aerial Faith Plate puzzle element. The map underwent many visual refinements, but it's one of the few puzzles that remained almost completely unchanged from its first form..[2]
Test Chamber 06[edit]

- "Let's see what the next test is. Oh. Advanced Aerial Faith Plates. Well. Have fun soaring through the air without a care in the world. I have to go to the wing that was made entirely of glass and pick up fifteen acres of broken glass. By myself."
- ― GLaDOS[src]
This test involves more advanced use of Aerial Faith Plates. The goal is to get a Weighted Storage Cube from the Vital Apparatus Vent above the first Aerial Faith Plate, over to the Super Button near the exit on the other side of the moat. The Aerial Faith Plates will only take Test Subject to a small ledge initially, so they need to create a Fling in order to continue on to the exit.
Before the Weighted Storage Cube can be received through the Vital Apparatus Vent, several items from the maintenance areas of Portal, from later areas of Portal 2 or from the co-op campaign drop out, including a chair, a Defective Turret, two Edgeless Safety Cubes, a working radio, and a CD.
A Ratman den can be found near this Test Chamber, near the portalable surfaces requiring Flinging. Unlike previously encountered radios, the radio in this chamber plays "Still Alive", like the radios in Portal. Getting the radio to the Ratman den causes it to play a Portal-like hidden transmission, which unlocks the "Final Transmission" Achievement.
Getting the Weighted Storage Cube onto the Super Button without touching will also unlock the "Drop Box" Achievement.
Test Chamber 07[edit]

- "Every test chamber is equipped with an Emancipation Grill at its exit, so that test subjects can't smuggle test objects out of the test area. This one is broken. Don't take anything with you."
- ― GLaDOS[src]
The goal of this test is to find a way out of the pit and get up to the area above and then use the Weighted Companion Cube to activate a Super Button and create a path to the exit. To accomplish this, Chell has to first use the Thermal Discouragement Beam to control the moving platform and then use portals to create a series of Flings for both herself and the cube.
Even if the player manages to take the Companion Cube to the exit, GLaDOS will fizzle it, saying: "I think that one was about to say 'I love you.' They're sentient, of course. We just have a lot of them."
Removing the Companion Cube from the room by using portals will unlock the "Preservation of Mass" Achievement.
Test Chamber 08[edit]

- "This next test involves Emancipation Grills. Remember? I told you about them in the last test area, that did not have one."
- ― GLaDOS[src]
In this test, Chell has to find a way of getting a Discouragement Redirection Cube past the Material Emancipation Grill, and then use it to reflect the Thermal Discouragement Beam into the receptacle to open the exit. To accomplish this, she needs to use the small hole in the glass to create portals on either side of the chamber so that she can move through them with the Weighted Storage Cube.
At the start, the turbines of the Enrichment Center malfunction and GLaDOS has to temporarily leave, giving to Chell only the "fast" version of the test's explanation, which is an incomprehensible sped-up sentence. When slowed down, the sentence reveals itself to be "and methodically knocking people’s hats off—then, I account it high time to get to sea as soon as I can.", an excerpt from Herman Melville's novel Moby-Dick.
Behind the scenes[edit]
According to Tejeev Kohli, Valve needed a puzzle that would demonstrate the different effects that the fizzler has on the game. This map was consistently the one that most of the playtesters would get stuck on and the developers tried various things to make the puzzle easier to understand. Originally this room had two fizzlers in it and was divided up into three distinct areas. This proved to be too complicated and almost none of the playtesters could solve the puzzle. The developers removed the second fizzler and simplified the layout of the room quite a bit but most of the playtesters were still getting stuck on it. Valve identified the problem to be the space above the fizzler. Originally this space was completely open, but that didn’t effectively convey to the players that they needed to shoot a portal above the fizzler. The developers then tried putting glass with several holes in it above the fizzler. This was slightly more effective as players would know that the holes are there for a purpose and would try to solve the puzzle by shooting portals through the holes. The map was still not testing well though, as players could not figure out which side of the fizzler they needed to be on when they shot their portals. Valve then changed it to have only a single hole through the glass, moved down to the eye level of the player, so that shooting the portal from either side of the fizzler would be a valid solution. This change tested really well and the developers started seeing most of their playtesters make it through the level without getting stuck on it for a long time.[2]
Test Chamber 09[edit]

- "Look at you. Sailing through the air majestically. Like an eagle. Piloting a blimp."
- ― GLaDOS[src]
This Test Chamber starts Portal 2’s third chapter, The Return. Before entering the chamber, a Panel is seen malfunctioning.
The goal of this test is to first find a way onto the upper section of the chamber, and then find a way to get the Thermal Discouragement Beam into the receptacle on the other side of a free standing wall. To accomplish this, Chell has to use the Aerial Faith Plate, which seems to be not properly calibrated for her weight, to generate momentum and create flings out of the various angled surfaces to reach the different areas of the chamber.
Wheatley appears again briefly in this chamber.
Test Chamber 10[edit]

- "Enjoy this next test. I'm going to go to the surface. It's a beautiful day out. Yesterday I saw a deer. If you solve this next test, maybe I'll let you ride an elevator all the way up to the break room, and I'll tell you about the time I saw a deer again."
- ― GLaDOS[src]
In this chamber, both types of cubes are used to stop and redirect Discouragement Beams, the goal being to use Aerial Faith plates to ascend to the chamber lock.
Chell has to first find a way to fling across the pit to the Weighted Storage Cube. At the front of each floor there is a barrier blocking the path across to the next Aerial Faith Plate and the only means of controlling them is through the use of the Thermal Discouragement Beam. Both barriers are need to be lowered simultaneously to create the path to the exit and doing this will require the usage of both cubes and portals.
If the player leaves the Weighted Storage Cube on the topmost floor of this chamber without activating the Vital Apparatus Vent, GLaDOS will spawn a Redirection Cube.
An Achievement, "Overclocker", is given to the player if the test is completed in 70 seconds or less.
Test Chamber 11[edit]

- "These bridges are made from natural light that I pump in from the surface. If you rubbed your cheek on one, it would be like standing outside with the sun shining on your face. It would also set your hair on fire, so don't actually do it."
- ― GLaDOS[src]
This chamber introduces the Hard Light Bridge testing element, which can be used to create stable paths that Test Subjects can walk across and are primarily used for crossing safely over pits or moats.
The goal of this test is to use portals to extend the Hard Light Bridges across different parts of the moat, creating a pathway first to the Vital Apparatus Vent to acquire a Weighted Storage Cube, and then to the Super Button Chell has to place it on.
Test Chamber 12[edit]

This test expands on the principles of the previous Test Chamber.
Chell has to use portals to extend Hard Light Bridges over areas of the moat to create a safe area for the Weighted Storage Cube to land on and then get it to the Super Button near the exit.
A Ratman den can be found in this Test Chamber.
Test Chamber 13[edit]

- "This next test involves turrets. You remember them, right? They're the pale spherical things that are full of bullets. Oh wait. That's you in five seconds. Good luck."
- ― GLaDOS[src]
In Test Chamber 13 GLaDOS introduces deadly Sentry Turrets into the testing process. These machines can very quickly cut down anyone who gets caught in their tracking beam.
The goal of this test is to find a a way of safely navigating through the turret-filled chamber, while also acquiring one of the Weighted Storage Cubes and using it to activate a Super Button. To accomplish this, Chell has to place portals in advantageous positions to get the drop on the Sentry Turrets.
Test Chamber 14[edit]

In this chamber, Chell is introduced to another new testing element - Relays, which needs to have a Thermal Discouragement Beam passing through it in order to be activated.
The goal of this test is to have all three Relays activated at the same time so that the exit opens. To accomplish this, Chell has to use a combination of the Discouragement Redirection Cube and portals to correctly align the Thermal Discouragement Beam and open the exit.
Test Chamber 15[edit]

The goal of this test is to find a way of safely acquiring the Weighted Storage Cube from between a group of Sentry Turrets, and then use it to activate a Super Button and open the exit. The main obstacles in the way of completing the test are the number of Sentry Turrets around the room, so Chell has to use the Hard Light Bridge to block their shots by extending it through portals around the chamber.
If the player enters the room behind the barrier without opening the exit door, GLaDOS will lower the glass.
Test Chamber 16[edit]

The goal of this test is for Test Subject to find a way to get the Thermal Discouragement Beam into the receptacle on the other side of the glass wall to lower the barrier blocking the path to the exit, without being killed by the Sentry Turrets. To accomplish this, Chell needs to use the Thermal Discouragement Beam to destroy the Sentry Turrets using a combinations of portals and Discouragement Redirection Cubes.
A Ratman den can be found in this Test Chamber.
Test Chamber 17[edit]

- "It says this next test was designed by one of Aperture's Nobel prize winners. It doesn't say what the prize was for. Well, I know it wasn't for Being Immune To Neurotoxin."
- ― GLaDOS[src]
The aim of this test is to find a way to control the position of the moving platform at the back of the chamber, while also activating the Super Button to open the exit. To accomplish this, Chell needs to use the portals to extend the Hard Light Bride and reposition the Weighted Storage Cube on the Super Button.
A Ratman den can be found in this Test Chamber.
Test Chamber 18[edit]

The aim of this test is to pass a Thermal Discouragement Beam through a series of Relays and into receptacle to open the exit and then find a way across to it without being killed by the Sentry Turret. To accomplish this, Chell has to use the Hard Light Bridge to block the Sentry Turret and then acquire the Discouragement Redirection Cubes and use them with the Thermal Discouragement Beam to both destroy the Sentry Turret and hit the Relays to open the exit.
Wheatley makes a lengthy appearance at the end of this chamber.
This Test Chamber starts the fourth chapter, The Surprise.
Test Chamber 19[edit]
The goal of this test is to find a way of passing the Thermal Discouragement Beam through a series of Relays around the chamber and use it to destroy the Sentry Turrets before directing it into a receptacle. To accomplish hits, Chell needs to use the Aerial Faith Plate to generate momentum, and use flings to reach the high ledges and Discouragement Redirection Cube positions.
Gallery[edit]
Test Chamber 19 recreated by Valve in an early version of the Puzzle Maker.

Test Chamber 20[edit]

- "Federal regulations require me to warn you that this next Test Chamber... is looking pretty good. That's right. The facility is completely operational again."
- ― GLaDOS[src]
GLaDOS introduces this Test Chamber as the first one which is completely functional.
The aim of this test is to get each of the Thermal Discouragement Beams in the main part of the chamber around the corner and into one of the receptacles near the exit. To accomplish this, Chell has to use a combination of Discouragement Redirection Cubes and portals to create a new path that ignores the corner.
Test Chamber 21[edit]

- "I've got a surprise for you after this next test. Not a fake, tragic surprise like last time. A real surprise, with tragic consequences. And real confetti this time. The good stuff. Our last bag. Part of me's going to miss it, I guess-but at the end of the day it was just taking up space."
- ― GLaDOS[src]
The goal of this test is to find a means of acquiring a Weighted Storage Cube before it alls into the moat. To accomplish this, Chell needs to use portals to extend the Hard Light Bridge so that it passes next to the switch and below the Vital Apparatus Vent.
Midway through the test, Wheatley turns off the lights and reveals himself. He tries talking in a bad American accent, thinking it is beyond GLaDOS' range of hearing, but realizes that is false and just breaks out of the chamber with Chell.
If Chell decides to stay in the chamber, GLaDOS will fill the room with neurotoxin that will kill her in fifteen seconds.
Behind the scenes[edit]
According to Erik Robson, the breakout sequence in this chamber was originally a lot longer, involving Wheatley talking to the player in a "horrible" American accent, assuming GLaDOS can't hear him. Simultaneously, the designers would have GLaDOS commenting on the entire ridiculous exchange, because of course she can hear him. When Valve playtested the concept, every player made a beeline for the opening. The designers either had to ditch all the dialogue or figure out a reason for the player to stand around for five minutes even though they could escape at any time. They ditched the dialogue.[2]
Test Chamber 22[edit]

- "The irony is that you were almost at the last test. Here it is. Why don't you just do it? Trust me, it's an easier way out than whatever asinine plan your friend came up with."
- ― GLaDOS[src]
If Chell enters this Test Chamber, she will realize it was a death trap, as the door locks behind her while the room fills with neurotoxin, which will kill her within five seconds. There is an exit door on the adjacent side of the entrance with plants visible through it, but it shuts itself when she gets close to it; there is also a series of white panels making a heart shape on the wall.
Interestingly, picking up the Weighted Cube from the Super Button will not shut the exit doors; it will be fizzled by GLaDOS, though, if the player tries to leave the chamber.
List of appearances[edit]
Main games[edit]
- Portal 2 (First appearance)
Other[edit]
References[edit]
| Preceded by GLaDOS' testing track (Portal) |
Portal 2 journey | Succeeded by Turret Manufacturing |