Cooperative Testing Courses
This article is a stub. Maybe you can help by expanding it. |
|---|
| This article would greatly benefit from the addition of one or more new images. | ||
|---|---|---|
Please upload one or several relevant images (from canonical / official sources) and place it here. Once finished, this notice may be removed. |
| Cooperative Testing Courses | |
|---|---|
| General information | |
| Location | |
| Usage | |
| Era(s) | |
| Faction | |
| Game information | |
| Map(s) |
All |
The Cooperative Testing Courses are Aperture Science Enrichment Center testing tracks used for Cooperative Testing Initiatives. Spread across different parts of the facility and connected to the Hub, the Cooperative Testing Courses make up the co-op part of Portal 2.
Contents
Overview[edit]
GLaDOS has made it so that the last map of each series is set outside the testing area, so that she can have ATLAS and P-body put each time a DVD in a player, revealing data only useful to her. The main purpose of these tests is to have the robots acquire human traits so that the camera placed at the entrance to the Extended Relaxation Annex is fooled by thinking the robots are humans, thus clearing the access to the vault, and giving GLaDOS access to thousands of fresh human Test Subjects.
Calibration Course[edit]
This section is empty or incomplete. Maybe you can help by expanding it. |
Set in the modern facility, it serves as introducing Test Subjects to the basics of testing. GLaDOS explains how to use the ping tool and Test Subjects are asked to choose their favorite animal in a table of 9, including a horse, a deer, a rooster, an elephant, a wolf, a moose, a baboon, a porcupine, and a rhinoceros, as well as their favorite element in a periodic table of 9 elements taken from columns 11 to 13, including copper, zinc, gallium, silver, cadmium, indium, gold, mercury, and thallium.
Gallery[edit]

Animal shapes used for calibration.
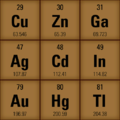
Periodic table used for calibration.


Testing Courses[edit]
Team Building[edit]
Set in the modern facility, it involves testing with most of the Aperture technology, and serves as getting Test Subjects to get used to co-operative testing. The last map is set in Turret Manufacturing.
Test Chamber 01[edit]
The very first co-op chamber is very basic, with only Heavy Duty Super-Colliding Super Buttons and portals being the testing elements to work with.
The goal of this Test Chamber is for Test Subjects to get through to the other side of the room which is separated by glass. There are two Heavy Duty Super-Colliding Super Buttons that operate the doors needed to gain acces to either side of the room, and portable surfaces on both sides which they need to make use of.
Test Chamber 02[edit]
This Test Chamber adds several testing elements to the equation, such as water hazard and a timed door. This is also the first instance of a chamber being divided into individual puzzle rooms via airlock doors. Test Subjects are presented with puzzle elements that require multiple Aperture Science Switches to activate and which must be pressed quickly, forcing well communication and planning.
Room 01[edit]
There is a large water hazard, with the airlock door on the other side of the room. The Aperture Science Switch opens the airlock door for a brief time. One Test Subject has to man the switch while the other heads to the door.
Room 02[edit]
Test Subjects receive the Edgeless Safety Cube required to open three doors when all four Aperture Science Switches around the room are pressed quickly. This requires good timing and quickness from both players.
Test Chamber 03[edit]
This Test Chamber introduces the next basic elements in cooperative puzzles - Thermal Discouragement Beams, Thermal Beam Relays, and Discouragement Redirection Cubes. The Test Subjects will also come cross turrets for the first time.
Room 01[edit]
There are two walls separating the beam from the Relays and the receptacle. The laser must be sent through them, hitting both testing elements.
Room 02[edit]
The beam receptacle is on the left wall behind the glass; Test Subjects need to hit the Relay and send the beam into it, after having destroyed the turrets first. Doing so raises the stair and allows the players to continue.
Test Chamber 04[edit]
In this chamber the success of the team relies on good communication and teamwork. It features a button which controls the shape of the room, and the puzzle resolves around it.
The Redirection Cube needed to reflect the beam must be obtained from the maze on the other side of the room. One Test Subject must control these walls while the other navigates through the deadly construction. The sparse portal surfaces in the maze can be taken use of to make the task quicker and easier.
Test Chamber 05[edit]
This Test Chamber features another puzzle involving Thermal Beams. Once again, Test Subjects need excellent communication and quick reflexes, taking time with the different receptacles to see the effects of triggering them. One of the players has to make their way around the goo moat in order to reach the exit on the other side and create a portal for their partner, while the other one controls the machinery.
Test Chamber 06[edit]
This "chamber" presents the first time in the co-op campaign that the Test Subjects will leave the official testing grounds of Aperture Science, finding themselves in Section F Appendages of Turret Manufacturing, where portable surfaces are few and far between. They will also come across their first simultaneous level pull puzzle. This chamber must be completed by inserting the disc into the player to finish the course, as with all the final chambers in each course.
Mass and Velocity[edit]
This section is empty or incomplete. Maybe you can help by expanding it. |

Set in the modern facility. The last map is set somewhere in the salt mine.
Test Chamber 01[edit]
This chamber is divided into two sections. The first requires both Test Subjects to use their portals to fling each other across an expanse in order to proceed past a set of glass Panels. In the second area, one of the Test Subjects must use portals to transport the other one onto one of two Super Buttons that will activate a Vital Apparatus Vent. The other Test Subject must then use portals to reach the second button and activate the Vent, which deposits an Edgeless Safety Cube. Once the Edgeless Safety Cube has been inserted into the Edgeless Safety Cube Receptacle, the exit door opens nearby, allowing both Test Subjects to leave the chamber.
Test Chamber 02[edit]
This section is empty or incomplete. Maybe you can help by expanding it. |
Test Chamber 03[edit]
This section is empty or incomplete. Maybe you can help by expanding it. |
Test Chamber 04[edit]
This section is empty or incomplete. Maybe you can help by expanding it. |
Test Chamber 05[edit]
This section is empty or incomplete. Maybe you can help by expanding it. |
Test Chamber 06[edit]
This section is empty or incomplete. Maybe you can help by expanding it. |
Test Chamber 07[edit]
This section is empty or incomplete. Maybe you can help by expanding it. |
Test Chamber 08[edit]
This section is empty or incomplete. Maybe you can help by expanding it. |
Salt mine[edit]
This section is empty or incomplete. Maybe you can help by expanding it. |
Hard-Light Surfaces[edit]
This section is empty or incomplete. Maybe you can help by expanding it. |
Set in the overgrown section of the modern facility, it tests the Hard Light Bridge. The last map is set in a Hard Light Bridge factory.
Test Chamber 01[edit]
This section is empty or incomplete. Maybe you can help by expanding it. |
Test Chamber 02[edit]
This section is empty or incomplete. Maybe you can help by expanding it. |
Test Chamber 03[edit]
This section is empty or incomplete. Maybe you can help by expanding it. |
Test Chamber 04[edit]
This section is empty or incomplete. Maybe you can help by expanding it. |
Test Chamber 05[edit]
This section is empty or incomplete. Maybe you can help by expanding it. |
Test Chamber 06[edit]
This section is empty or incomplete. Maybe you can help by expanding it. |
Test Chamber 07[edit]
This section is empty or incomplete. Maybe you can help by expanding it. |
Test Chamber 08[edit]
This section is empty or incomplete. Maybe you can help by expanding it. |
Hard Light Bridge factory[edit]
This section is empty or incomplete. Maybe you can help by expanding it. |
Excursion Funnels[edit]
This section is empty or incomplete. Maybe you can help by expanding it. |
Set in the modern facility, it tests the Excursion Funnel. The last map is set again in Turret Manufacturing.
Test Chamber 01[edit]
This section is empty or incomplete. Maybe you can help by expanding it. |
Test Chamber 02[edit]
This section is empty or incomplete. Maybe you can help by expanding it. |
Test Chamber 03[edit]
This section is empty or incomplete. Maybe you can help by expanding it. |
Test Chamber 04[edit]
This section is empty or incomplete. Maybe you can help by expanding it. |
Test Chamber 05[edit]
This section is empty or incomplete. Maybe you can help by expanding it. |
Test Chamber 06[edit]
This section is empty or incomplete. Maybe you can help by expanding it. |
Test Chamber 07[edit]
This section is empty or incomplete. Maybe you can help by expanding it. |
Test Chamber 08[edit]
This section is empty or incomplete. Maybe you can help by expanding it. |
Test Chamber 09[edit]
This section is empty or incomplete. Maybe you can help by expanding it. |
Turret Manufacturing[edit]
This section is empty or incomplete. Maybe you can help by expanding it. |
Mobility Gels[edit]
This section is empty or incomplete. Maybe you can help by expanding it. |
Set in the Co-op Test Shaft in the Enrichment Shaft series, and leading to the Extended Relaxation Annex, it tests the Mobility Gels (Repulsion and Propulsion only).
Test Chamber 01[edit]
This section is empty or incomplete. Maybe you can help by expanding it. |
Test Chamber 02[edit]
This section is empty or incomplete. Maybe you can help by expanding it. |
Test Chamber 03[edit]
This section is empty or incomplete. Maybe you can help by expanding it. |
Test Chamber 04[edit]
This section is empty or incomplete. Maybe you can help by expanding it. |
Test Chamber 05[edit]
This section is empty or incomplete. Maybe you can help by expanding it. |
Test Chamber 06[edit]
This section is empty or incomplete. Maybe you can help by expanding it. |
Art Therapy[edit]
This Testing Course consists of Portal 2’s DLC, Peer Review.
Test Chamber 01[edit]
This section is empty or incomplete. Maybe you can help by expanding it. |
Test Chamber 02[edit]
This section is empty or incomplete. Maybe you can help by expanding it. |
Test Chamber 03[edit]
This section is empty or incomplete. Maybe you can help by expanding it. |
Test Chamber 04[edit]
This section is empty or incomplete. Maybe you can help by expanding it. |
Test Chamber 05[edit]
This section is empty or incomplete. Maybe you can help by expanding it. |
Test Chamber 06[edit]
This section is empty or incomplete. Maybe you can help by expanding it. |
Test Chamber 07[edit]
This section is empty or incomplete. Maybe you can help by expanding it. |
Test Chamber 08[edit]
This section is empty or incomplete. Maybe you can help by expanding it. |
Prototype chamber[edit]
This section is empty or incomplete. Maybe you can help by expanding it. |
Behind the scenes[edit]
The game files reveal there were originally four courses: "Mind the Gap", "Fly Me To The Portal", "Splatter House", and "Hall of Lasers".[1]
List of appearances[edit]
- Portal 2 (First appearance)
- Peer Review