Turret Manufacturing
| Warning! This article has yet to be cleaned up to a higher standard of quality, per our Cleanup Project. It may contain factual errors and nonsense, as well as spelling, grammar and structure issues, or simply structure problems. Reader's discretion is advised until fixing is done. | ||
|---|---|---|
You can help clean up this page by correcting spelling and grammar, removing factual errors and rewriting sections to ensure they are clear and concise, and moving some elements when appropriate. |
| This article would greatly benefit from the addition of one or more new images. | ||
|---|---|---|
Please upload one or several relevant images (from canonical / official sources) and place it here. Once finished, this notice may be removed. |
| | |
| Turret Manufacturing | |
|---|---|
| General information | |
| Location | |
| Builder |
|
| Usage | |
| Era(s) | |
| Faction | |
| Game information | |
| Map(s) |
|
The Turret Manufacturing is a department wing in the Aperture Science Enrichment Center, in which the mass production and the stockpiling of the Sentry Turrets take place.
In the single-player campaign of Portal 2, it is visited by Chell and Wheatley in the chapter The Escape. During the cooperative campaign, ATLAS and P-body partially visits an unknown section of the wing in Test Course 4: Excursion Funnels.
Contents
Overview[edit]
This department consists of the Turret Assembly and Storage; large metal crates producing the Turrets either shipping directly into the Tube Network or into storage, Turret Redemption Lines; conveyor belts leading to incinerators, and the Quality Passing Lines.
Assembly and Storage[edit]
Chell and Wheatley finally arrive into the Turret Manufacturing wing, where the latter guides Chell's path with a built-in flashlight as GLaDOS shuts off most of the electricity to scare the duo away from the area. Chell reaches into the Turret Assembly and Storage section, where Turrets can be seen being boxed and put through the Tube Network where they will be delivered throughout the Enrichment Center.
Due to the lack of Management Rails that would bring Wheatley lower into the section, Chell is forced to split up and to meet with him later on.
Redemption Lines[edit]

Currently separated from Wheatley, Chell ventures through this section in hopes of reuniting with him.
In a typical Aperture Science fashion, the functionality of this section is relatively simple (in this case, a conveyor to an incinerator), given a jazzed-up and ironic name.
When entering this area, the Announcer warns that the conveyor belts are active and instructs Chell to avoid engaging with Turrets "headed towards redemption". Once Chell is on the conveyor belt, the Announcer warns that the lines are not rides, and urges her to exit the line.
Various broken and dismantled Turrets are seen being sent towards "redemption", one of which is the Oracle Turret.
Quality Passing Lines[edit]
Chell finally leaves the Redemption Line, to where she finally reunites with Wheatley; waiting inside a control room housing the Master Turret (template for production quality).
The section houses a conveyor belt, and an Emergency Intelligence Incinerator as a means of disposing defective Turrets. Beyond the conveyor belt, houses a control room where a Master Turret will be scanned for a quality pass.
Wheatley observes the system but fails to come up with a method to sabotage the Turrets. Instead, Chell grabs one of the defective Turrets being catapulted towards the incinerator, and puts it in place as the Master Turret. This causes the quality of the Turrets produced to degrade, as the normally qualified Turrets are now considered defective. This plan effectively causes GLaDOS to lose one of her more important arsenals in defeating the two.
Related Achievements[edit]
| Portal 2 | |
|---|---|

|
Scanned Alone (5G) |
| Stand in a defective turret detector. | |

|
No Hard Feelings (10G) |
| Save a turret from redemption. | |
Behind the scenes[edit]
According to Aaron Nicholls, Valve felt that most players of Portal, including the developers themselves, wanted more opportunities to look behind the scenes of Aperture Science, and not only into deserted crawlspaces, but also the vital heart of the facility. The Turret Manufacturing was a way for them to satisfy this desire, while also answering the question of where all the testing elements originate from. As the turret creation process is constantly alluded to throughout the game, the developers thought it would be satisfying from a story standpoint to finally show it to the player. They also believed it would be "easy enough to extrapolate a similar creation path for all the other items that Aperture generates only to be consumed by the endless process of product testing." To build on this idea, the turrets are said to never make it to shipping. As soon as one of them is completely finished and packed in a box, it is immediately sent to the unboxer, where it goes on to recycling and begins its life anew. Thus, Aperture Science is shown continually building and repurposing its items in the most inefficient way. Valve didn't build the actual unboxer, but they pictured it being located immediately below the boxing machine. Nicholls also stated that while the turrets would be reduced to their components, the boxes would be discarded and end up in a steadily growing mountain of unrecycled packing materials.[1]
Trivia[edit]
- Picking up the Oracle Turret seen on the Turret Redemption Line will award the player an achievement and some quotes foreshadowing major storyline events in Portal 2.
- Despite the Master Turret apparently being perfectly functional, it explodes shortly after Chell picks it up, much like a Defective Turret.
- Standing in the template scanner will award the "Scanned alone" achievement. Standing in the scanner does not affect it, possibly because it only accepts Turrets as templates.
- The scanner itself, which turns and scans each turret, uses the same model as the camera from the first Portal, mounted on a panel arm.
Gallery[edit]
This section is empty or incomplete. Maybe you can help by expanding it. |
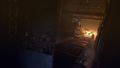
Turret Manufacturing seen on a menu background video.
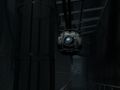
Wheatley guiding Chell through a blackout.
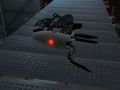
The Oracle Turret.


List of appearances[edit]
References[edit]
| Preceded by GLaDOS' testing track (Portal 2) |
Portal 2 journey | Succeeded by Employee Daycare Center |
| Preceded by Hub |
Portal 2 co-op journey | Succeeded by Co-op Test Shaft |